分析技术研习室

课题组每周研讨会
Driver mutation 识别方法(部分)简介
背景
众所周知,癌症的发生主要是由于突变的累计引起的,但是癌症细胞中有着成千上万的突变,并不是所有突变都对肿瘤的演化具有促进作用。我们把对癌症发展具有正向作用的突变定义为“driver mutation”,其他突变定义为”passage mutation”。因此从大量的mutations中鉴别driver mutation对于癌症的治疗是十分重要的。
目前识别driver mutation 的方法大致可以分为两类:1.基于突变频率 2. 基于功能影响评分
基于突变频率的方法最适合于寻找频繁发生的driver事件,而应用于罕见的driver事件时性能较差。 相比之下,基于功能影响的方法无法找到人们对基因组元素了解不足或注释不明确的驱动因素。
方法
今天主要介绍两种方法,Driverpower和ActiveDriverWGS。
1.Driverpower

第一步首先是筛选排除的区域

第二步是使用GBM建模,或者使用随机套索+GLM
1.GBM: 使用的XGBoost算法
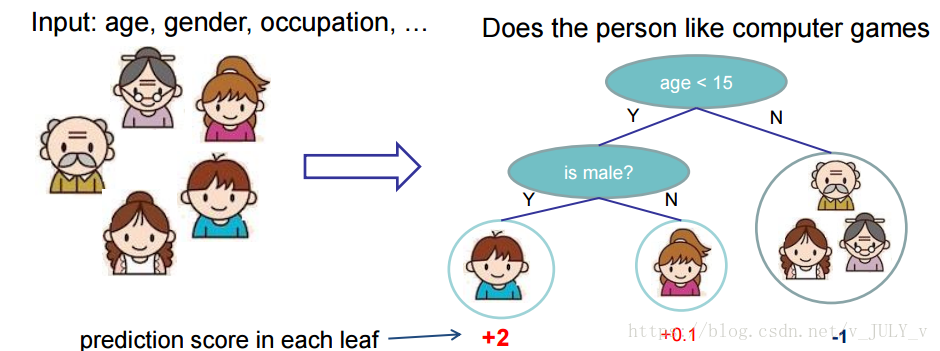
先来举个例子,我们要预测一家人对电子游戏的喜好程度,考虑到年轻和年老相比,年轻更可能喜欢电子游戏,以及男性和女性相比,男性更喜欢电子游戏,故先根据年龄大小区分小孩和大人,然后再通过性别区分开是男是女,逐一给各人在电子游戏喜好程度上打分,如下图所示。
训练出了2棵树tree1和tree2,类似之前gbdt的原理,两棵树的结论累加起来便是最终的结论,所以小孩的预测分数就是两棵树中小孩所落到的结点的分数相加:2 + 0.9 = 2.9。爷爷的预测分数同理:-1 + (-0.9)= -1.9。具体如下图所示:
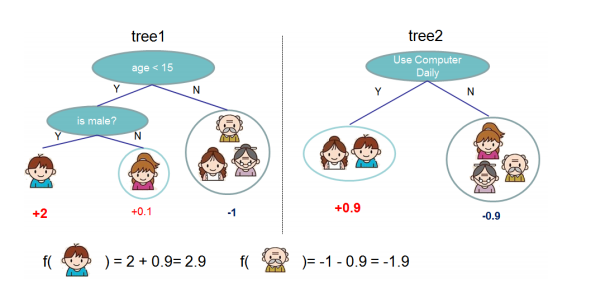
XGBoost的核心算法思想基本就是:
- 不断地添加树,不断地进行特征分裂来生长一棵树,每次添加一个树,其实是学习一个新函数f(x),去拟合上次预测的残差。
- 当我们训练完成得到k棵树,我们要预测一个样本的分数,其实就是根据这个样本的特征,在每棵树中会落到对应的一个叶子节点,每个叶子节点就对应一个分数
- 最后只需要将每棵树对应的分数加起来就是该样本的预测值。
以负泊松对数似然为目标函数,以元素的ln(N*L)作为偏移量
N是样本数量,L是元件长度
2.随机套索+GLM
使用随机套索进行特征选择 \(w_k=arg \min\limits_{w} \rVert logit \left( \frac {y+1/2}{N \cdot L} \right) - Xw \rVert_2^2 + \alpha \sum_{i=1}^{1373} \frac{\arrowvert w_i\arrowvert}{b_i}\) X是特征矩阵,w是权重矢量,α是正则化参数,bi是比例因子。
用GLM预测BMR \(y \sim B (n,p) \ with \ n = N \cdot L \ and p = \frac {\widehat{y}}{N \cdot L}\)
y是观察到的突变计数,y是估计的突变计数。 我们使用二项式GLM通过logit链接函数获得y ^,即 \(\frac {\widehat{y}}{N \cdot L}=E\left( \frac {y}{N \cdot L}| X^{select} \right)= logit^{-1}\left( X^{select}\beta\right)\) 其中Xselect是所选特征矩阵,β是回归系数向量。
第三步,使用观测的突变数量与预测的突变数量进行负荷测试,并执行多次测试矫正
第四步,根据功能影响得分对近显著的element(q<0.25)调整观察到的突变计数
For CDS, CADD (SNVs and indels, v1.3), DANN (SNVs) and EIGEN (SNVs) scores were used. CADD indel scores were generated with the CADD web interface for all observed indels in the PCAWG data set. For splice site, CADD and DANN scores were used. For non-coding elements, the CADD, DANN and LINSIGHT (SNVs and indels) score were used.
首先,检索数据集中所有观察到的突变的原始分数。 其次,所有原始分数都通过 **\(-10log_{10}(rank/N_m)\) **转换为phred-like分数,其中Nm是观察到的具有分数的突变数。 第三,对于每个基因组元素,其功能评分S计算为: \(S=\frac {1}{N}\sum\limits_{i=1}^{n}\ s_i\)
Si是第i个样本的平均功能影响评分。
最后一步是通过功能调整的突变计数,然后进行多次测试校正,重新评估近乎重要元素的重要性
Driverpower的安装和运行
安装
# [Optional] Create a new environment for DriverPower
conda create --name driverpower
# [Optional] Activate the environment
conda activate driverpower
# Setup Bioconda Channels if not set before
# https://bioconda.github.io/user/install.html#set-up-channels
conda config --add channels defaults
conda config --add channels bioconda
conda config --add channels conda-forge
# Install DriverPower
conda install -c smshuai driverpower
数据准备
# 合并特征数据
cat train_feature.hdf5.part1 train_feature.hdf5.part2 train_feature.hdf5.part3 > train_feature.hdf5
md5sum train_feature.hdf5  # should be cb4af6bc7979efa087955f94909dd065
#下载python脚本
wget https://raw.githubusercontent.com/smshuai/DriverPower/master/script/prepare.py
callable.bed.gz ,DriverPower中使用的列入白名单的基因组区域; 可以用染色体长度文件(BED格式)替换以使用整个基因组。大约占全基因的96.41%
对于从ICGC下载的突变数据进行预处理
library(stringr)
a<-read.table("simple_somatic_mutation25.open.tsv.gz",sep="\t",header=T) ##读入数据
b<-a[,c(9,10,11,15,17,2)] ##提取需要的数据
c<-str_c("chr",b[,1],sep="")
b[,1]<-c
c<-unique(b)
write.table(c,file="~/mutation/CRC/clean-mutation25.tsv",sep="\t",quote=F,col.names=F,row.names=F)
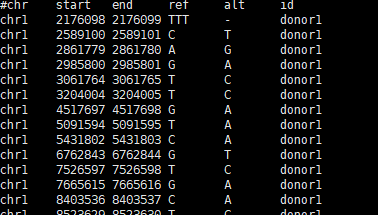
对于突变进行功能打分
zcat ./random_mutations.tsv.gz | \
awk 'BEGIN{OFS="\t"} $4 != "-" && $5 != "-" {print $1,$3,".",$4,$5}' | \
head -1000 | gzip > random_mutations.1K.vcf.gz
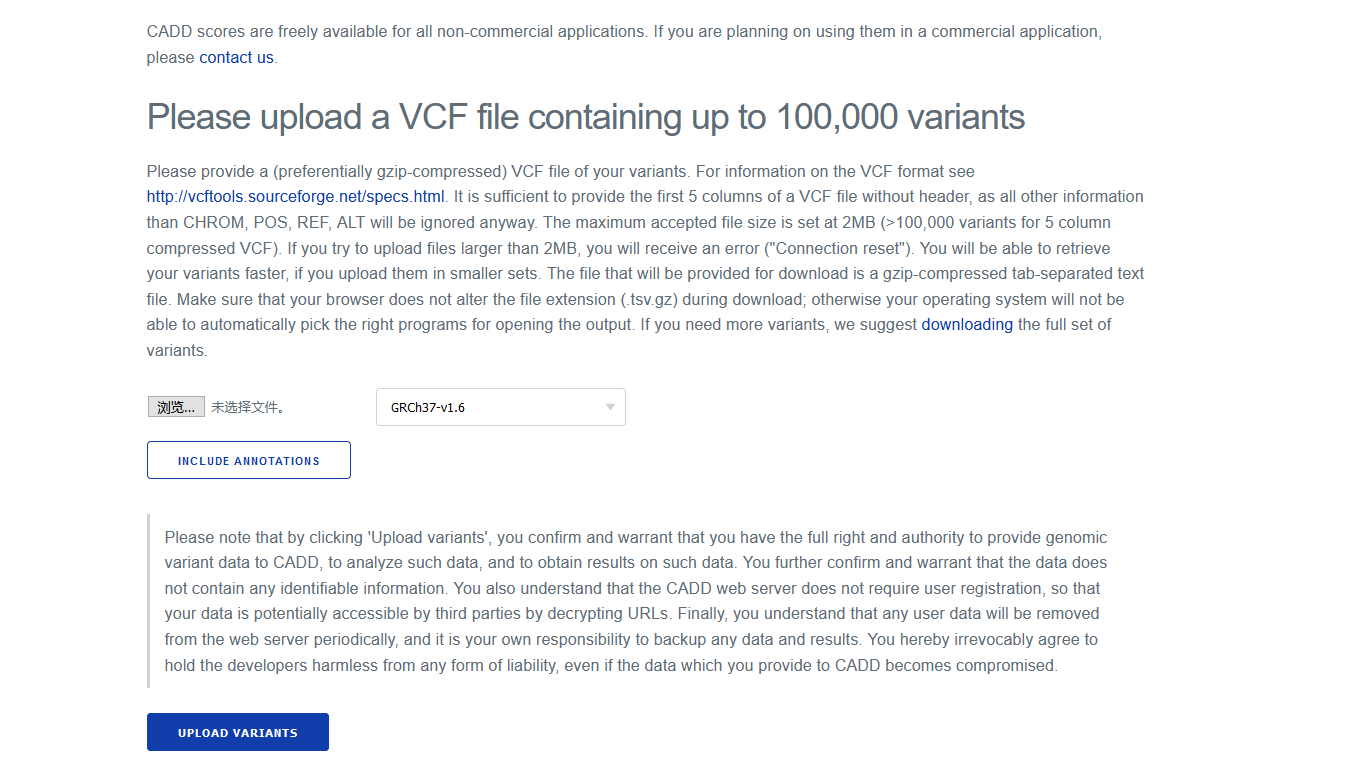
把突变文件上传到CADD网站
运行
python ~/driverpower/prepare.py noncoding-mutation.tsv.gz ~/driverpower/train_elements.tsv.gz ~/driverpower/callable.bed.gz train_y.tsv  ##训练集
bedtools bed12tobed6 -i ~/driverpower/test_elements.bed12.gz | cut -f1-4 > test_elements.tsv    ###获得测试元件
python ~/driverpower/prepare.py noncoding-mutation.tsv.gz test_elements.tsv ~/driverpower/callable.bed.gz test_y.tsv  ##把测试元件和白名单元件取交集,并统计突变数目

mkdir output
###建立背景
driverpower model \
    --feature ~/driverpower/train_feature.hdf5 \
    --response train_y.tsv \
    --method GBM \
    --gbmParam xgb_param.pkl
    --name tutorial \
    --modelDir ./output
####计算功能分数
zcat ./GRCh37-25.tsv.gz | tail -n +3 | awk 'BEGIN {OFS="\t"} {print "chr"$1, $2-1, $2, $6}' | bedtools intersect -a ./test_elements.tsv -b stdin -wa -wb > CADD_ele.tsv
# The 4th column is the element ID and the 8th column is the CADD PHRED score
printf "binID\tCADD\n" > CADD_per_ele_score.tsv
bedtools groupby -i ./CADD_ele.tsv -g 4 -c 8 -o mean  >> CADD_per_ele_score.tsv

####识别候选driver
driverpower infer \
    --feature ~/driverpower/test_feature.hdf5 \
    --response test_y.tsv \
    --model ./output/tutorial.GBM.model.pkl \
    --name 'DriverPower_burden_function' \
    --outDir ./output/ \
    --funcScore CADD_per_ele_score.tsv \
    --funcScoreCut "CADD:0.01"

一般认为q<0.1的为显著,q<0.25的为近显著
–gbmParam xgb_param.pkl
import pickle

# Default parameter for XGBoost used in DriverPower
param = {'max_depth': 8,
         'eta': 0.05,  # learning rate
         'subsample': 0.6,
         'nthread': 15,  # number of threads; recommend using the number of available CPUs
         'objective': 'count:poisson',
         'max_delta_step': 1.2,
         'eval_metric': 'poisson-nloglik',
         'silent': 1,
         'verbose_eval': 100,  # print evaluation every 100 rounds
         'early_stopping_rounds': 5,
         'num_boost_round': 5000  # max number of rounds; usually stop within 1500 rounds
        }

# Dump to pickle
with open('xgb_param.pkl', 'wb') as f:
    pickle.dump(param, f)
~/miniconda3/envs/test/bin/python pickle.py
这是一个通过合并突变负荷和功能影响信息来准确识别驱动和乘客突变的新框架。该方法利用了WGS技术产生的大型体细胞突变集,借助一千多个基因组特征构建了准确的全局BMR模型,与使用选定区域或侧翼区域构建本地BMR模型的方法形成对比。其优点之一是该方法不偏向于编码区,而是在编码和非编码区都使用相同的模型挖掘癌症driver。该方法的另一个优点是高度模块化。DriverPower可以与其他类型的基因组元素(编码的或非编码的)、用于建模BMR的其他回归算法以及其他功能影响评分方案一起使用。此外,尽管DriverPower是为WGS项目设计的,但它在WES策略中也表现出色。
2.ActiveDriverWGS
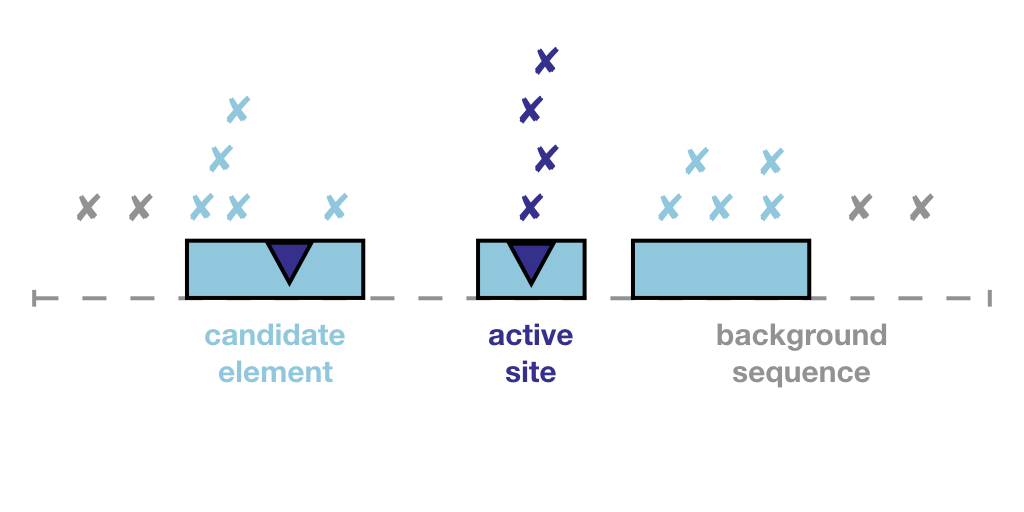
ActiveDriverWGS是基于Poisson广义线性回归的局部突变富集模型,该模型通过观察元素周围至少100 kbps的背景窗口中的突变来确定基因组元素中预期的突变数,包括区域上游和下游的±50 kbps 。
library(ActiveDriverWGS)
data("cll_mutations")
data("cancer_genes")
data("cancer_gene_sites")

some_genes = c("ATM", "MYD88", "NOTCH1")

results = ActiveDriverWGS(mutations = cll_mutations,
                          elements = cancer_genes[cancer_genes$id %in% some_genes,],
                          sites = cancer_gene_sites)

 library(GenomicRanges)
 library(ActiveDriverWGS)
  library(parallel)
 cll_mutations<-read.table("/public/slst/home/ningwei/mutation/CLL/WGS-mutation.tsv.gz",sep="\t")
 cancer_genes<-read.table("/public/slst/home/ningwei/mutation/CLL/new-element2.tsv")
 ##a<-read.table("~/data/a-b-comparment/test_elements-CLL.ts

 colnames(cll_mutations)<-c("chr","pos1","pos2","ref","alt","patient")
 colnames(cancer_genes)<-c("chr","start","end","id")

 ################获得元件
 gr_element_coords = GRanges(seqnames = cancer_genes$chr,
                             IRanges(start = cancer_genes$start,
                                     end = cancer_genes$end),
                             mcols = cancer_genes$id)
 ##############设置感兴趣位点
 gr_site_coords = GRanges()

 this_genome = BSgenome.Hsapiens.UCSC.hg19::Hsapiens

 ##############删除超突变(每mb的突变数目大于30)
 cll_mutations = format_muts(cll_mutations, this_genome,
                             filter_hyper_MB = 30)

      3 remove hypermut, n= 1927030 ,  89 %
      hypermuted samples:  DO229346 DO229353 DO230659

       reversing 0 positions
##########################
gr_maf = GRanges(cll_mutations$chr,
                 IRanges(start = cll_mutations$pos1,
                         end = cll_mutations$pos2),
                 mcols = cll_mutations[,c("patient", "tag")])
##################
 id<-a[i]
result = ADWGS_test(id = id,
                      gr_element_coords = gr_element_coords,
                      gr_site_coords = gr_site_coords,
                      gr_maf = gr_maf,
                      win_size = 50000, this_genome = this_genome)