分析技术研习室
课题组每周研讨会
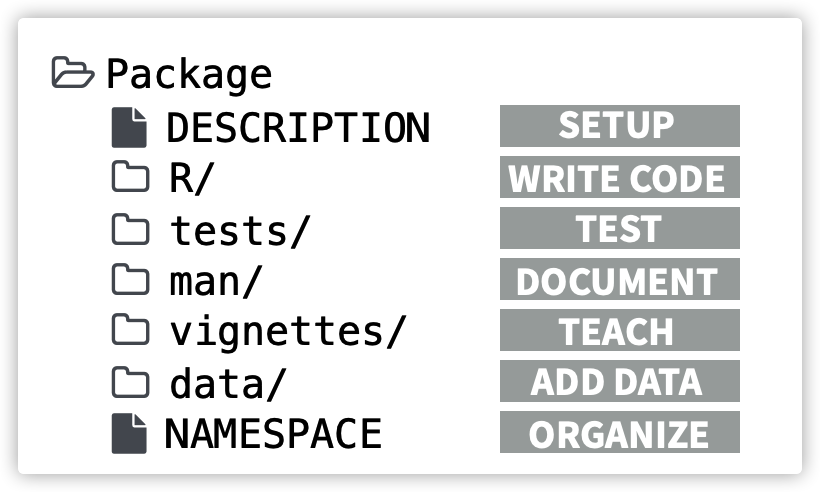
首先来看一下整个创建R包的基本流程,然后在具体的讲解每一个部分
第一步是确保开发所需要的R包已经安装好了,主要是devtools
install.packages("devtools")
library(devtools)
使用create_package()函数初始化一个新的package:
usethis::create_package("~/test/toypackages")

✓ Creating '/Users/macos/test/toypackages/'
✓ Setting active project to '/Users/macos/test/toypackages'
✓ Creating 'R/'
✓ Writing 'DESCRIPTION'
Package: toypackages
Title: What the Package Does (One Line, Title Case)
Version: 0.0.0.9000
Authors@R (parsed):
    * First Last <first.last@example.com> [aut, cre] (YOUR-ORCID-ID)
Description: What the package does (one paragraph).
License: `use_mit_license()`, `use_gpl3_license()` or friends to
    pick a license
Encoding: UTF-8
LazyData: true
Roxygen: list(markdown = TRUE)
RoxygenNote: 7.1.1
✓ Writing 'NAMESPACE'
✓ Writing 'toypackages.Rproj'
✓ Adding '.Rproj.user' to '.gitignore'
✓ Adding '^toypackages\\.Rproj$', '^\\.Rproj\\.user$' to '.Rbuildignore'
✓ Opening '/Users/macos/test/toypackages/' in new RStudio session
✓ Setting active project to '<no active project>'
执行这个命令后会自动创建一个新的目录和project,并打开一个新的Rstudio界面进入该project
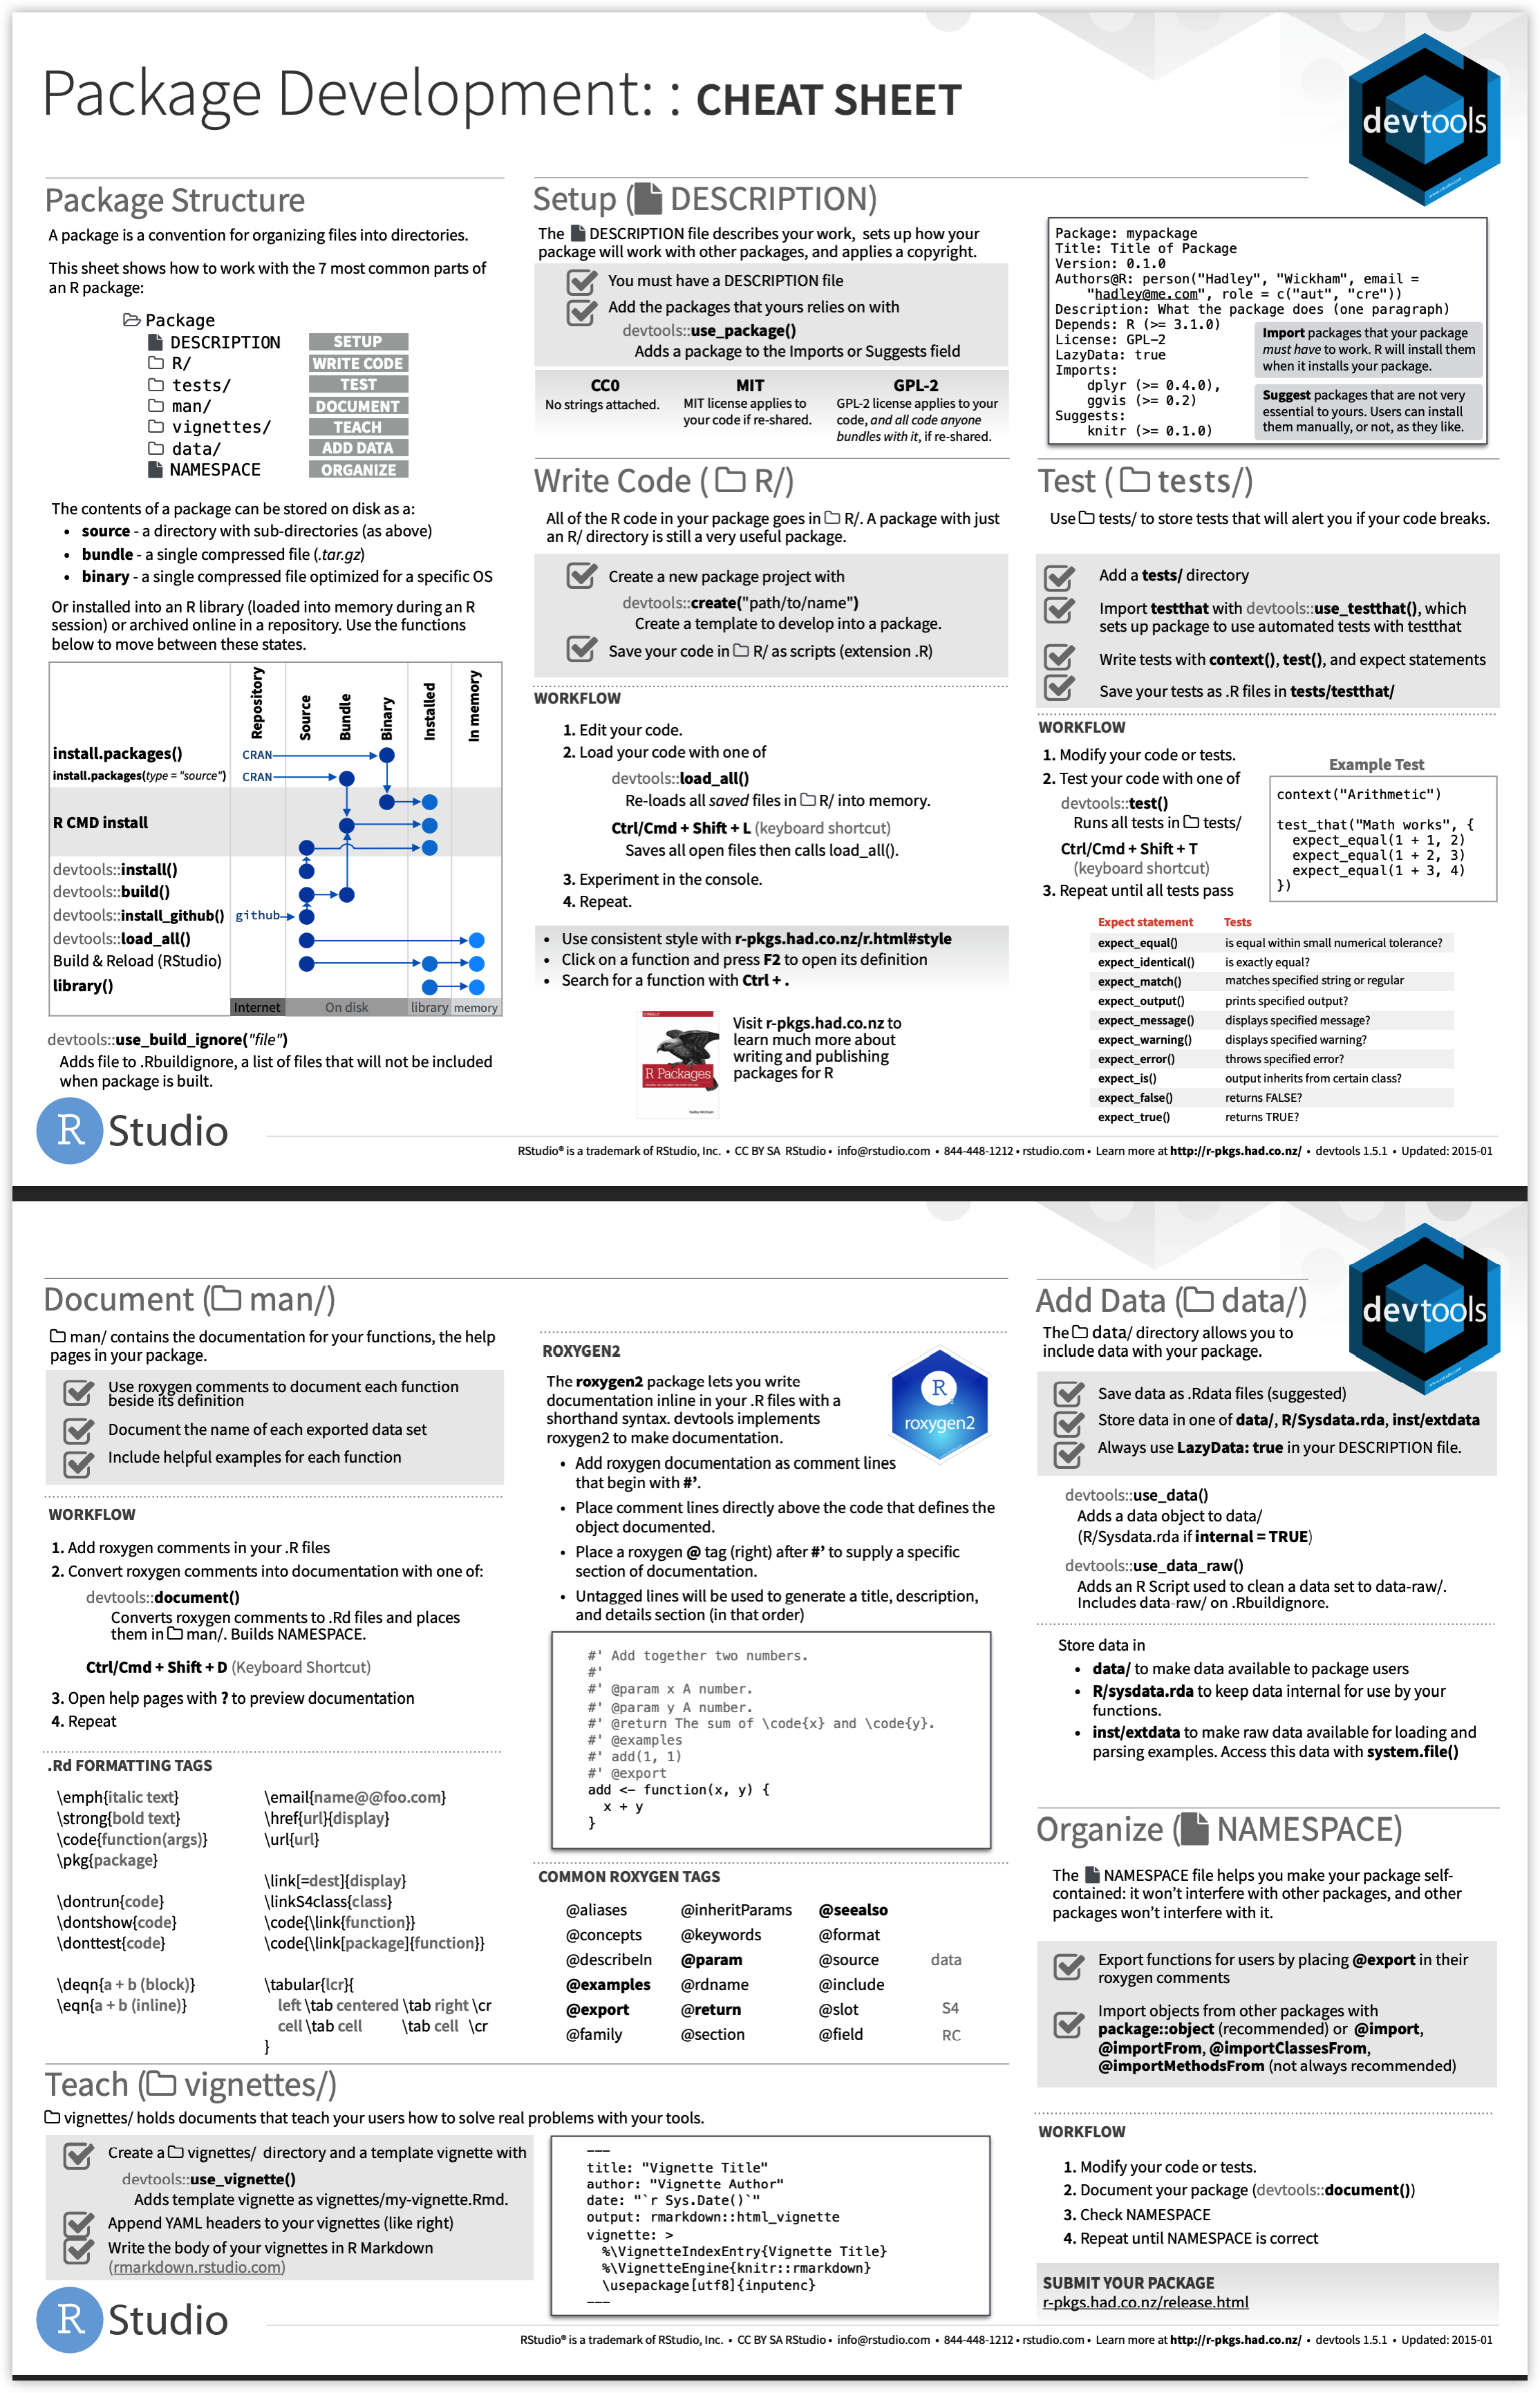
我们需要注意这个项目和一般的项目的区别:
-
在
Environment那个pane多了一个bulid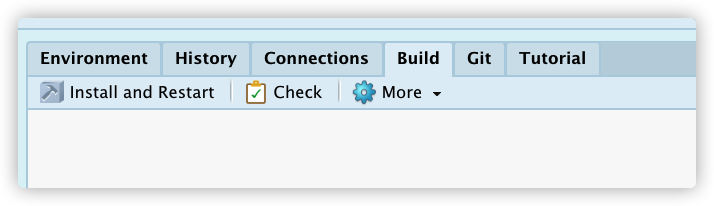
-
另外多了一些文件

现在添加第一个函数:使用use_r()创建一个R/*.R的文件来存放这个函数:
usethis::use_r("fbind")
✓ Setting active project to '/Users/macos/test/toypackages'
● Modify 'R/fbind.R'
● Call `use_test()` to create a matching test file
use_r会自动打开一个R脚本文件,现在添加fbind函数,这个函数将两个因子向量聚合起来:
fbind <- function(a, b) {
  factor(c(as.character(a), as.character(b)))
}
然后测试一下这个函数是否工作正常,先使用load_all来载入我们创建的函数(load_all()模拟了building, installing, attaching步骤)
> devtools::load_all()
Loading toypackages
> a <- factor(c("character", "hits", "your", "eyeballs"))
> b <- factor(c("but", "integer", "where it", "counts"))
> fbind(a,b)
[1] character hits      your      eyeballs  but       integer   where it  counts
Levels: but character counts eyeballs hits integer where it your
Load_all 快捷键:Ctrl + Shift + L (Windows & Linux) or Cmd + Shift + L (macOS)
另外在添加函数之后,上面的文件结构也会发生变化,多了一个man文件夹:
我们已经检查过fbind函数工作正常,那我们怎么确定我们添加这个函数后包的其他部分也运作正常呢?可以使用check函数自动检查:
> devtools::check()

Updating toypackages documentation
Loading toypackages
─ Building ──────────────────────────────── toypackages ─
Setting env vars:
● CFLAGS    : -Wall -pedantic -fdiagnostics-color=always
● CXXFLAGS  : -Wall -pedantic -fdiagnostics-color=always
● CXX11FLAGS: -Wall -pedantic -fdiagnostics-color=always
─────────────────────────────────────────────
✓  checking for file ‘/Users/macos/test/toypackages/DESCRIPTION’ ...
─  preparing ‘toypackages’:
✓  checking DESCRIPTION meta-information ...
─  checking for LF line-endings in source and make files and shell scripts
─  checking for empty or unneeded directories
   Removed empty directory ‘toypackages/man’
─  building ‘toypackages_0.0.0.9000.tar.gz’

─ Checking ──────────────────────────────── toypackages ─
Setting env vars:
● _R_CHECK_CRAN_INCOMING_REMOTE_: FALSE
● _R_CHECK_CRAN_INCOMING_       : FALSE
● _R_CHECK_FORCE_SUGGESTS_      : FALSE
● NOT_CRAN                      : true
── R CMD check ───────────────────────────────────────────────────────────────────────────
─  using log directory ‘/private/var/folders/s1/z_mkhs313cgbplp38856sxk40000gn/T/Rtmp7UAmyG/toypackages.Rcheck’
─  using R version 4.0.2 (2020-06-22)
─  using platform: x86_64-apple-darwin17.0 (64-bit)
─  using session charset: UTF-8
─  using options ‘--no-manual --as-cran’
✓  checking for file ‘toypackages/DESCRIPTION’
─  this is package ‘toypackages’ version ‘0.0.0.9000’
─  package encoding: UTF-8
✓  checking package namespace information
✓  checking package dependencies (1.3s)
✓  checking if this is a source package
✓  checking if there is a namespace ...
✓  checking for executable files ...
✓  checking for hidden files and directories
✓  checking for portable file names
✓  checking for sufficient/correct file permissions
✓  checking serialization versions
✓  checking whether package ‘toypackages’ can be installed (1.1s)
✓  checking installed package size ...
✓  checking package directory ...
N  checking for future file timestamps (3.7s)
   unable to verify current time
W  checking DESCRIPTION meta-information ...
   Non-standard license specification:
     `use_mit_license()`, `use_gpl3_license()` or friends to pick a
     license
   Standardizable: FALSE
✓  checking top-level files ...
✓  checking for left-over files
✓  checking index information
✓  checking package subdirectories ...
✓  checking R files for non-ASCII characters ...
✓  checking R files for syntax errors ...
✓  checking whether the package can be loaded ...
✓  checking whether the package can be loaded with stated dependencies ...
✓  checking whether the package can be unloaded cleanly ...
✓  checking whether the namespace can be loaded with stated dependencies ...
✓  checking whether the namespace can be unloaded cleanly ...
✓  checking loading without being on the library search path ...
✓  checking dependencies in R code ...
✓  checking S3 generic/method consistency (377ms)
✓  checking replacement functions ...
✓  checking foreign function calls ...
✓  checking R code for possible problems (1.5s)
✓  checking for missing documentation entries ...
─  checking examples ... NONE
✓  checking for non-standard things in the check directory
✓  checking for detritus in the temp directory

   See
     ‘/private/var/folders/s1/z_mkhs313cgbplp38856sxk40000gn/T/Rtmp7UAmyG/toypackages.Rcheck/00check.log’
   for details.


── R CMD check results ─────────────────────────────────────── toypackages 0.0.0.9000 ────
Duration: 9.9s

> checking DESCRIPTION meta-information ... WARNING
  Non-standard license specification:
    `use_mit_license()`, `use_gpl3_license()` or friends to pick a
    license
  Standardizable: FALSE

> checking for future file timestamps ... NOTE
  unable to verify current time

0 errors ✓ | 1 warning x | 1 note x
check 快捷键:Ctrl + Shift + E (Windows & Linux) or Cmd + Shift + E (macOS).
可以看到有1个警告,1个note
waring是因为Non-standard license specification
添加license需要在DESCRIPTION文件修改,这个文件是提供包的metadata的
默认生成的内容:
Package: toypackages
Title: What the Package Does (One Line, Title Case)
Version: 0.0.0.9000
Authors@R:
    person(given = "First",
           family = "Last",
           role = c("aut", "cre"),
           email = "first.last@example.com",
           comment = c(ORCID = "YOUR-ORCID-ID"))
Description: What the package does (one paragraph).
License: `use_mit_license()`, `use_gpl3_license()` or friends to
    pick a license
Encoding: UTF-8
LazyData: true
Roxygen: list(markdown = TRUE)
RoxygenNote: 7.1.1
现在对其进行修改:加上作者 包的名称 简介等
Package: toypackages
Title: learn how to bulid a package
Version: 0.0.0.9000
Authors@R:
    person(given = "aa",
           family = "bb",
           role = c("aut", "cre"),
           email = "11111@qq.com",
           comment = c(ORCID = "YOUR-ORCID-ID"))
Description: learn how to bulid a package.
License: `use_mit_license()`, `use_gpl3_license()` or friends to
    pick a license
Encoding: UTF-8
LazyData: true
Roxygen: list(markdown = TRUE)
RoxygenNote: 7.1.1
然后就可以用use_mit_license()来解决刚才的那个警告,加上license,这里使用MIT license
usethis::use_mit_license("aa bb")
✓ Setting License field in DESCRIPTION to 'MIT + file LICENSE'
✓ Writing 'LICENSE.md'
✓ Adding '^LICENSE\\.md$' to '.Rbuildignore'
✓ Writing 'LICENSE'
再check一下:
> load_all()
Loading toypackages
> devtools::check()
Updating toypackages documentation
Loading toypackages
Writing NAMESPACE
Writing NAMESPACE
─ Building ──────────────────────────────── toypackages ─
Setting env vars:
● CFLAGS    : -Wall -pedantic -fdiagnostics-color=always
● CXXFLAGS  : -Wall -pedantic -fdiagnostics-color=always
● CXX11FLAGS: -Wall -pedantic -fdiagnostics-color=always
─────────────────────────────────────────────
✓  checking for file ‘/Users/macos/test/toypackages/DESCRIPTION’ ...
─  preparing ‘toypackages’:
✓  checking DESCRIPTION meta-information ...
─  checking for LF line-endings in source and make files and shell scripts
─  checking for empty or unneeded directories
─  building ‘toypackages_0.0.0.9000.tar.gz’

─ Checking ──────────────────────────────── toypackages ─
Setting env vars:
● _R_CHECK_CRAN_INCOMING_REMOTE_: FALSE
● _R_CHECK_CRAN_INCOMING_       : FALSE
● _R_CHECK_FORCE_SUGGESTS_      : FALSE
● NOT_CRAN                      : true
── R CMD check ───────────────────────────────────────────────────────────────────────────
─  using log directory ‘/private/var/folders/s1/z_mkhs313cgbplp38856sxk40000gn/T/Rtmp7UAmyG/toypackages.Rcheck’
─  using R version 4.0.2 (2020-06-22)
─  using platform: x86_64-apple-darwin17.0 (64-bit)
─  using session charset: UTF-8
─  using options ‘--no-manual --as-cran’
✓  checking for file ‘toypackages/DESCRIPTION’
─  this is package ‘toypackages’ version ‘0.0.0.9000’
─  package encoding: UTF-8
✓  checking package namespace information
✓  checking package dependencies (1.7s)
✓  checking if this is a source package
✓  checking if there is a namespace ...
✓  checking for executable files ...
✓  checking for hidden files and directories
✓  checking for portable file names
✓  checking for sufficient/correct file permissions ...
✓  checking serialization versions
✓  checking whether package ‘toypackages’ can be installed (1.1s)
✓  checking installed package size ...
✓  checking package directory ...
N  checking for future file timestamps (6.7s)
   unable to verify current time
✓  checking DESCRIPTION meta-information ...
✓  checking top-level files ...
✓  checking for left-over files
✓  checking index information
✓  checking package subdirectories ...
✓  checking R files for non-ASCII characters ...
✓  checking R files for syntax errors ...
✓  checking whether the package can be loaded ...
✓  checking whether the package can be loaded with stated dependencies ...
✓  checking whether the package can be unloaded cleanly ...
✓  checking whether the namespace can be loaded with stated dependencies ...
✓  checking whether the namespace can be unloaded cleanly ...
✓  checking loading without being on the library search path ...
✓  checking dependencies in R code ...
✓  checking S3 generic/method consistency (375ms)
✓  checking replacement functions ...
✓  checking foreign function calls ...
✓  checking R code for possible problems (1.5s)
✓  checking Rd files ...
✓  checking Rd metadata ...
✓  checking Rd line widths ...
✓  checking Rd cross-references ...
✓  checking for missing documentation entries ...
✓  checking for code/documentation mismatches ...
✓  checking Rd \usage sections (463ms)
✓  checking Rd contents ...
✓  checking for unstated dependencies in examples ...
✓  checking examples (444ms)
✓  checking for non-standard things in the check directory
✓  checking for detritus in the temp directory

   See
     ‘/private/var/folders/s1/z_mkhs313cgbplp38856sxk40000gn/T/Rtmp7UAmyG/toypackages.Rcheck/00check.log’
   for details.


── R CMD check results ─────────────────────────────────────── toypackages 0.0.0.9000 ────
Duration: 14.9s

> checking for future file timestamps ... NOTE
  unable to verify current time

0 errors ✓ | 0 warnings ✓ | 1 note x
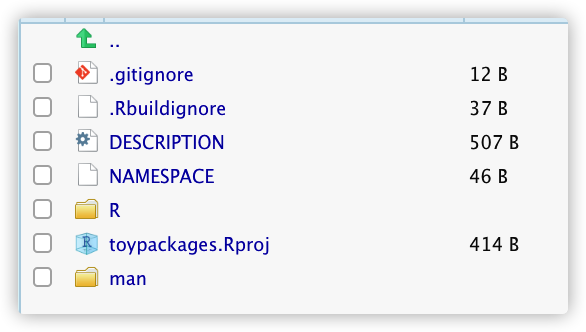
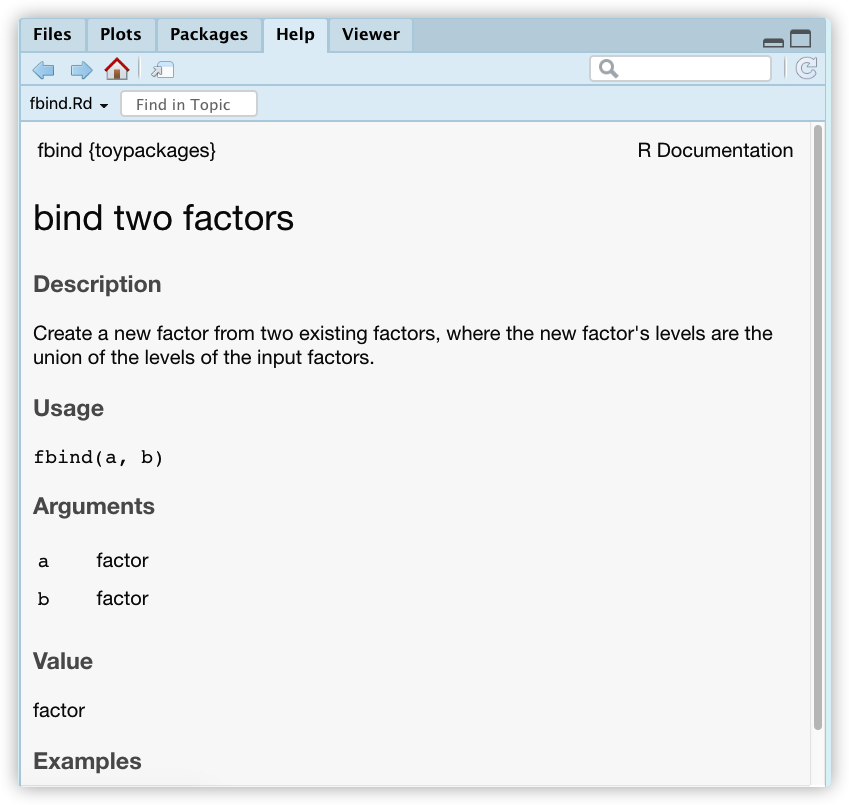
可以为函数加上一些帮助文档,文档放在man文件夹里面后缀是.Rd是Rmarkdown文件
写文档的时候可以直接在函数上面以标准格式的形式写注释,再使用roxygen2包来生成.Rd文件
打开fbind.R文件,然后点击Code>Insert roxygen skeleton(注意,这个时候光标要在函数内部)
就可以插入模板了,可以在此基础上进行修改:
#' Title
#'
#' @param a
#' @param b
#'
#' @return
#' @export
#'
#' @examples
fbind <- function(a, b) {
  factor(c(as.character(a), as.character(b)))
}
#' bind two factors
#'
#'Create a new factor from two existing factors, where the new factor's levels
#'are the union of the levels of the input factors.
#'
#' @param a factor
#' @param b factor
#'
#' @return factor
#' @export
#'
#' @examples
#' fbind(iris$Species[c(1, 51, 101)], PlantGrowth$group[c(1, 11, 21)])
fbind <- function(a, b) {
  factor(c(as.character(a), as.character(b)))
}
使用document函数来生成man/fbind.Rd文件:
> document()
Updating toypackages documentation
Loading toypackages
Writing NAMESPACE
Writing NAMESPACE
Document 快捷键:Ctrl + Shift + D (Windows & Linux) or Cmd + Shift + D (macOS).
然后我们就可以查看文档了:
> ?fbind
Rendering development documentation for 'fbind'
通过install函数安装这个包:
> install()
✓  checking for file ‘/Users/macos/test/toypackages/DESCRIPTION’ ...
─  preparing ‘toypackages’:
✓  checking DESCRIPTION meta-information ...
─  checking for LF line-endings in source and make files and shell scripts
─  checking for empty or unneeded directories
─  building ‘toypackages_0.0.0.9000.tar.gz’

Running /Library/Frameworks/R.framework/Resources/bin/R CMD INSTALL \
  /var/folders/s1/z_mkhs313cgbplp38856sxk40000gn/T//Rtmp7UAmyG/toypackages_0.0.0.9000.tar.gz \
  --install-tests
* installing to library ‘/Library/Frameworks/R.framework/Versions/4.0/Resources/library’
* installing *source* package ‘toypackages’ ...
** using staged installation
** R
** byte-compile and prepare package for lazy loading
** help
*** installing help indices
** building package indices
** testing if installed package can be loaded from temporary location
** testing if installed package can be loaded from final location
** testing if installed package keeps a record of temporary installation path
* DONE (toypackages)
现在重启Rstudio,测试包:
Restarting R session...

> library(toypackage)
> a <- factor(c("character", "hits", "your", "eyeballs"))
> b <- factor(c("but", "integer", "where it", "counts"))
>
> fbind(a, b)
[1] character hits      your      eyeballs  but       integer   where it  counts
Levels: but character counts eyeballs hits integer where it your
前面对于函数的测试都是非正式和规范的,接下来我们对这个函数做一些正式的单元测试(unit tests)
使用use_testthat()函数:
library(devtools)
use_testthat()
✓ Setting active project to '/Users/macos/test/toypackages'
✓ Adding 'testthat' to Suggests field in DESCRIPTION
✓ Creating 'tests/testthat/'
✓ Writing 'tests/testthat.R'
● Call `use_test()` to initialize a basic test file and open it for editing.
这个函数做了这些变动:
-
在
DESCRIPTION中加入了suggests:testthat:Package: toypackages Title: learn how to bulid a package Version: 0.0.0.9000 Authors@R: person(given = "aa", family = "bb", role = c("aut", "cre"), email = "11111@qq.com", comment = c(ORCID = "YOUR-ORCID-ID")) Description: learn how to bulid a package. License: MIT + file LICENSE Encoding: UTF-8 LazyData: true Roxygen: list(markdown = TRUE) RoxygenNote: 7.1.1 Suggests: testthat -
创建了
tests/testthat文件夹,并且在tests文件夹里生成了testthat.R文件: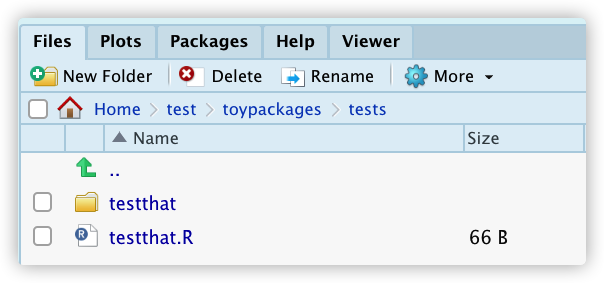
接下来我们使用use_test()函数创建一个测试文件:
> use_test("fbind")
✓ Writing 'tests/testthat/test-fbind.R'
● Modify 'tests/testthat/test-fbind.R'
生成的文件tests/testthat/test-fbind.R中原始内容为:
test_that("multiplication works", {
expect_equal(2 * 2, 4)
})
修改生成的默认文件,写入以下测试内容:
test_that("fbind() binds factor (or character)", {
x <- c("a", "b")
x_fact <- factor(x)
y <- c("c", "d")
z <- factor(c("a", "b", "c", "d"))
expect_identical(fbind(x, y), z)
expect_identical(fbind(x_fact, y), z)
})
进行测试:
> test()
Loading toypackages
Testing toypackages
✓ | OK F W S | Context
✓ | 2 | fbind
═ Results ════════════════════════════════════════
OK: 2
Failed: 0
Warnings: 0
Skipped: 0
test 快捷键:Ctrl + Shift + T (Windows & Linux) or Cmd + Shift + T (macOS)
有些时候我们想要在自己的包中调用其他包的函数,可以使用use_package()函数
比如想要对因子创建排序的频率表,需要引用forcats::fct_count():
> use_package("forcats")
✓ Adding 'forcats' to Imports field in DESCRIPTION
● Refer to functions with `forcats::fun()`
这个函数向DESCRIPTION文件中添加了Imports::forcats:
Package: toypackages
Title: learn how to bulid a package
Version: 0.0.0.9000
Authors@R:
    person(given = "aa",
           family = "bb",
           role = c("aut", "cre"),
           email = "11111@qq.com",
           comment = c(ORCID = "YOUR-ORCID-ID"))
Description: learn how to bulid a package.
License: MIT + file LICENSE
Encoding: UTF-8
LazyData: true
Roxygen: list(markdown = TRUE)
RoxygenNote: 7.1.1
Suggests:
    testthat
Imports:
forcats
最后可以use_readme_rmd()和build_readme()生成readme文件,对R包进行说明,包括包的描述;安装;示例
基本的流程是:
create_package创建一个R包use_r()写函数,插入roxygen注释和tag,使用document()生成文档load_all()载入包use_***_license添加licenseinstall安装包use_testthat()和use_test()生成测试文件;test()进行测试check对整个包进行检查use_readme_rmd()和build_readme()生成readme文件
创建包
注意包的名称只能包含字母数字和点号(不建议使用点号,可能会和文件拓展名或者S3方法混淆);必须以字母开头并且不能以点号结尾
创建包使用usethis::create_package(path)函数
如何将之前已经存在的源码包文件夹转化成一个Rstudio项目:
- File > New Project > Existing Directory
- 使用
create_package()参数是已经存在的目录 - 使用
usethis::use_rstudio()在已经存在的源码包目录内部使用
注意在开发的时候,工作路径最好是源码包的top-level
元数据 DESCRIPTION
元数据是存储在DESCRIPYION中,Rstudio和devtools将含有该文件的目录就认为是包目录
初始化的内容(usethis::create_package):
Package: toypackages
Title: What the Package Does (One Line, Title Case)
Version: 0.0.0.9000
Authors@R:
    person(given = "First",
           family = "Last",
           role = c("aut", "cre"),
           email = "first.last@example.com",
           comment = c(ORCID = "YOUR-ORCID-ID"))
Description: What the package does (one paragraph).
License: `use_mit_license()`, `use_gpl3_license()` or friends to
    pick a license
Encoding: UTF-8
LazyData: true
Roxygen: list(markdown = TRUE)
RoxygenNote: 7.1.1
DESCRIPTION文件的格式叫做DCF (Debian contral format);每一行都有一个filed名称和值,两者用冒号分开,当值有多行的时候需要缩进
Title字段一般比较短,只显示65个字符
Version表示版本号,版本号最少要有2个整数中间用点号或者横线隔开
推荐的格式:
releaesd版本由3个数字构成:<major>.<minor>.<patch>- In-development版本由4个数字构成,第四个是开发版本,从9000开始,所以包的第一个版本是
0.0.0.9000
Auther@R字段是作者的信息,是R代码:
Authors@R:
    person(given = "First",
           family = "Last",
           role = c("aut", "cre"),
           email = "first.last@example.com",
           comment = c(ORCID = "YOUR-ORCID-ID"))
person函数有4个主要的参数:
- 前两个参数(位置)是名字,
given在前(名),family在后(姓) email地址role有四个:crecreator or maintainer 有问题时应该联系额人aut对包贡献最大的人ctb贡献者cphcopyright holder 如果版权是作者以外的人或机构,要注明
Description是对包的描述,每行不超过80个字符,行间使用4个空格分开
license 字段可以是开源许可或者是一个文件file LICENCE
开源许可一般有3个:
- MIT
- GPL-2/GPL-3
- CC0
DESCRIPTION中会列出我们的R包需要依赖的R包
描述依赖用的是Imports和Suggests:
Imports:
   pkgname
Suggests:
   pkgname
两者的区别:
-
Imports描述的是包工作所必需的包,在我们的包被安装的时候,如果这些包之前没有被安装,这个时候会被安装 -
Suggests不是必需安装的,可能在示例数据,运行测试,创建vignettes或者包里面只有少量函数使用这些包,所以我们要在需要这些包的函数里面检查这些包是否安装(requireNamesapce(x,quietly=TRUE)):
最简单的方式去添加Imports和suggests就是使用usethis::use_package():
use_package(package, type = "Imports", min_version = NULL)
type参数指定是Imports还是Suggests,min_version参数指定包的最低版本
还有其他的fields可以用来表述依赖:
Depends在R2.14之前只有这一种方法来表示依赖LinkingTo在这里列出的包依赖于其他包的C或者C++代码Enhances在这里列出的包可以被我们的包增强
Depends和Imports的区别
当R调用一个函数的时候,会先在全局环境中搜索,如果没有在去search path中搜索
search path 是attached的包列表,可以通过search函数来获得当前的search path:
> search()
 [1] ".GlobalEnv"        "tools:rstudio"     "package:stats"     "package:graphics"
 [5] "package:grDevices" "package:utils"     "package:datasets"  "package:methods"
 [9] "Autoloads"         "package:base"

> library(tidyverse)
─ Attaching packages ───────────────────────── tidyverse 1.3.0 ─
✓ ggplot2 3.3.2     ✓ purrr   0.3.4
✓ tibble  3.0.3     ✓ dplyr   1.0.0
✓ tidyr   1.1.0     ✓ stringr 1.4.0
✓ readr   1.3.1     ✓ forcats 0.5.0
─ Conflicts ────────────────────────── tidyverse_conflicts() ─
x dplyr::filter() masks stats::filter()
x dplyr::lag()    masks stats::lag()
> search()
 [1] ".GlobalEnv"        "package:forcats"   "package:stringr"   "package:dplyr"
 [5] "package:purrr"     "package:readr"     "package:tidyr"     "package:tibble"
 [9] "package:ggplot2"   "package:tidyverse" "tools:rstudio"     "package:stats"
[13] "package:graphics"  "package:grDevices" "package:utils"     "package:datasets"
[17] "package:methods"   "Autoloads"         "package:base"
load和attach的区别:
- loading会载入代码,数据和DLL(动态共享库),S3,S4方法并运行
.onLoadload后包会在内存中,但是不在search path里面所有只有通过::才能使用包的元素(::也会自动载入包);也可以使用requireNamespace()orloadNamespace()来载入包 - attaching 将包放到search path中,
library()和require都会先load包再attach
Depends和Imports的唯一的区别就是Depends attach包;而Imports只load包;一般情况下只需在Imports里面列出需要的包,写函数的时候使用::来获取需要的函数;另外Imports或者Depends里面的包在安装的时候如果没有安装会自动安装,确保我们可以使用::
在DESCRIPTION中还可以使用URL字段提供额外的网址,使用BugReports提供错误报告额网址:
URL: https://yihui.name/knitr/
BugReports: https://github.com/yihui/knitr/issues
对象文档化 man/
标准方法是在man/文件夹下写.Rd文件,再渲染成HTML和PDF;但是可以使用roxygen2可以将特定格式的注释转化成.Rd文件,roxygen2除了生成.Rd文件外还可以更改NAMESPACE和DESVRIPTION中的Collate字段
基本的流程有4步:
- 将roxygen格式的注释添加到
.R文件中 - 使用
devtools::document()(或者使用快捷键:Ctrl/Cmd + Shift + D)将注释转化成.Rd文件 - 使用
?预览文档 - 修改,直到满意
举个例子:
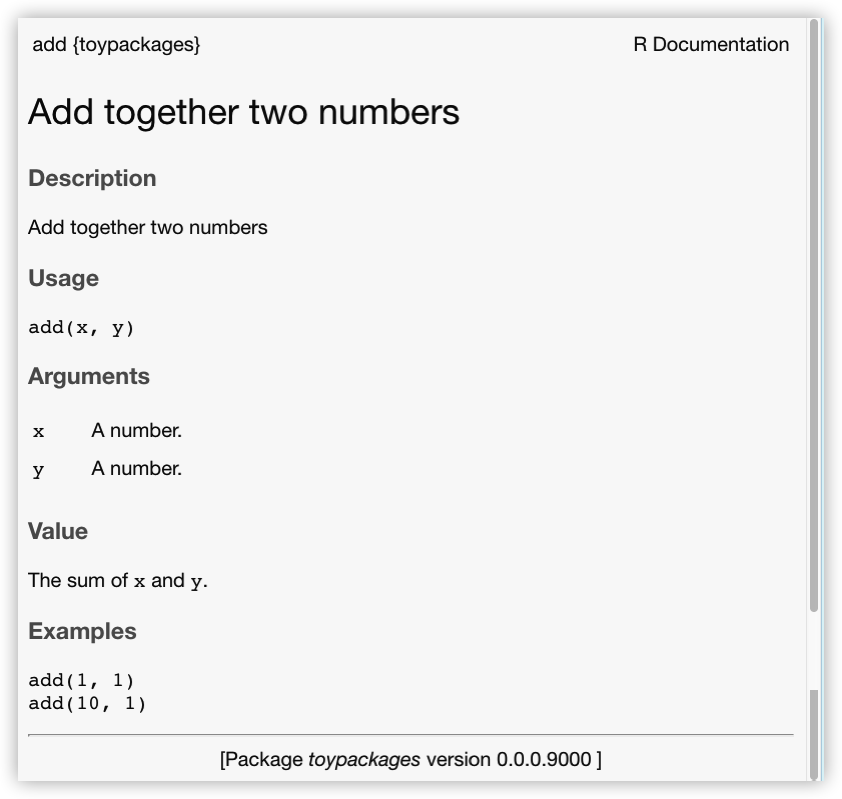
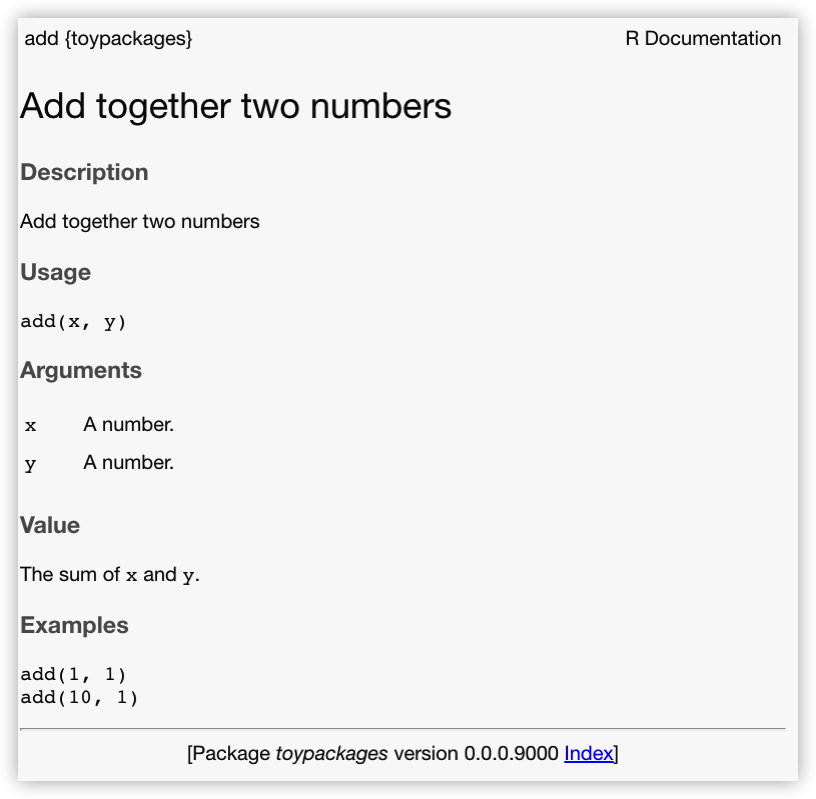
use_r("add")
#' Add together two numbers
#'
#' @param x A number.
#' @param y A number.
#' @return The sum of \code{x} and \code{y}.
#' @examples
#' add(1, 1)
#' add(10, 1)
add <- function(x, y) {
  x + y
}
devtools::document()
现在man/add.Rd文件就生成了:
% Generated by roxygen2: do not edit by hand
% Please edit documentation in R/add.R
\name{add}
\alias{add}
\title{Add together two numbers}
\usage{
add(x, y)
}
\arguments{
\item{x}{A number.}

\item{y}{A number.}
}
\value{
The sum of \code{x} and \code{y}.
}
\description{
Add together two numbers
}
\examples{
add(1, 1)
add(10, 1)
}
使用?就可以调出文档界面:
?add
可以使用Rstudio的install&Restart功能(bulid里面),他会完全重建包,包括更新所有的文档,安装包,重启R并且重新载入我们的包;进行这个操作后我们再?一下
点击index就会到显示所有函数的页面:

Roxygen 注释
Roxygen注释以#'开头,并且在函数的前面;所有在函数前面的roxygen行叫做一个block,每一行不超过80个字符
block被拆分成不同的tags,格式为:@tagName details; tag的内容包括一个tag名称后到下一个tag起始
因为@在tag里有特殊含义,所以当文档中出现@的时候要用@@来表示(比如email或者S4对象的slots)
每一个block在第一个tag前会包含一些文字,这部分叫做introduction,会被特殊地解析:
- 第一句是文档的名称,在文档页面的顶部显示
- 第二段是描述
- 第三段及以后 是details,在帮助文档中显示在参数描述的后面
可以使用@section tag加其他的信息,section的title必须是句子以冒号结尾如:
#' @section Warning:
#' Do not operate heavy machinery within 8 hours of using this function.
还有两个有用的tag:
@seealso可以导向其他的内容,如- web资源
\url{https://www.r-project.org} - 包中的内容:
\code{\link{functioname}} - 其他包中的内容
\code{\link[packagename]{functioname}}
- web资源
还有一些tag可以方便用户找到文档:
@aliases alias1 alias2 ...添加额外的别名,可以使用?@keywords keyword1 keyword2 ...添加关键词
注意 名称和描述也可以加上tag,@title和@description,但是一般不用加
文档化函数
大部分函数有3个tag: @param, @examples @return
@param name description@param参数后面接参数的名称和描述;描述必须以大写字母开头,点号结尾,可以是多行甚至多段;也可以同时对多个参数进行说明,用逗号隔开如:@param x,y Numeric vectors.@examples提供如何使用这个函数的R代码,可以使用\dontrun{}来包含会报错的代码;还可以将示例放到另外的文件夹中,并使用@example path/relative/to/package/root来插入,注意这种用法是@example没有s@return description对输出的描述
下面是sum函数的例子:
#' Sum of vector elements
#'
#' \code{sum} returns the sum of all the values present in its arguments.
#'
#' This is a generic function: methods can be defined for it directly
#' or via the \code{\link{Summary}} group generic. For this to work properly,
#' the arguments \code{...} should be unnamed, and dispatch is on the
#' first argument.
#'
#' @param ... Numeric, complex, or logical vectors.
#' @param na.rm A logical scalar. Should missing values (including NaN)
#'   be removed?
#' @return If all inputs are integer and logical, then the output
#'   will be an integer. If integer overflow
#'   \url{https://en.wikipedia.org/wiki/Integer_overflow} occurs, the output
#'   will be NA with a warning. Otherwise it will be a length-one numeric or
#'   complex vector.
#'
#'   Zero-length vectors have sum 0 by definition. See
#'   \url{https://en.wikipedia.org/wiki/Empty_sum} for more details.
#' @examples
#' sum(1:10)
#' sum(1:5, 6:10)
#' sum(F, F, F, T, T)
#'
#' sum(.Machine$integer.max, 1L)
#' sum(.Machine$integer.max, 1)
#'
#' \dontrun{
#' sum("a")
#' }
sum <- function(..., na.rm = TRUE) {}
文档化数据
有3个主要的方法可以在包中包含数据:
- 如果想要在包中包含二进制数据,并且可以被用户使用,将这些数据放在
data/文件夹中,这是放示例数据的最好的地方 - 如果想要包含解析后的数据,并且用户不可以使用,将这些数据放到
R/sysdata.rda,这些数据可以是函数运行所需要的 - 如果想要存储原始数据,可以放到
inst/extdata里面
data/文件夹中应该是.Rdata格式,含有单个对象,并且名字和文件名是一样的,可以使用usthis::use_data()来创建
> x <- sample(1000)
> usethis::use_data(x, mtcars)
✓ Adding 'R' to Depends field in DESCRIPTION
✓ Creating 'data/'
✓ Saving 'x', 'mtcars' to 'data/x.rda', 'data/mtcars.rda'
● Document your data (see 'https://r-pkgs.org/data.html')
如果在DESCRIPTION文件中含有LazyData: true的时候,这些数据只在使用的时候才会load,使用 usethis::create_package()会自动加上
在data/文件夹中的数据是处理后的数据,可以保留产生这些数据的原始数据(存放在data-raw中)和代码,可以使用usethis::use_data_raw()来完成,这个函数创建一个文件夹data-raw和DATASET.R文件,另外要注意在.Rbuildignore中加上这些原始数据,以便在build包中忽略这些文件:
usethis::use_data_raw()
✓ Creating 'data-raw/'
✓ Writing 'data-raw/DATASET.R'
● Modify 'data-raw/DATASET.R'
● Finish the data preparation script in 'data-raw/DATASET.R'
● Use `usethis::use_data()` to add prepared data to package
对这些数据进行docment的时候,是对这些数据的名称进行说明,并存放到R/目录下,比如在ggplot2包中对diamonds数据的说明存放在R/data.R中:
#' Prices of 50,000 round cut diamonds.
#'
#' A dataset containing the prices and other attributes of almost 54,000
#' diamonds.
#'
#' @format A data frame with 53940 rows and 10 variables:
#' \describe{
#'   \item{price}{price, in US dollars}
#'   \item{carat}{weight of the diamond, in carats}
#'   ...
#' }
#' @source \url{http://www.diamondse.info/}
"diamonds"
对数据进行document有额外的两个tag:
@format是对数据的overview,包含对每个变量的说明@source是对数据来源的说明,通常是网址\url{}
R/sysdata.rda的数据是函数所需的数据,可以使用usethis::use_data()函数,但是要加上internal = TRUE参数:
x <- sample(1000)
usethis::use_data(x, mtcars, internal = TRUE)

✓ Saving 'x', 'mtcars' to 'R/sysdata.rda'
文档化包
除了对函数,数据进行说明之外,也可以为整个包提供一个帮助页面,这个页面可以通过类似package?dplyr调出
对包进行document的时候,由于包没有相关联的对象,所以我们需要documentNULL然后再用tag @docType package 和 @name <package-name>来标记,也可以加section tag:
#' foo: A package for computating the notorious bar statistic
#'
#' The foo package provides three categories of important functions:
#' foo, bar and baz.
#'
#' @section Foo functions:
#' The foo functions ...
#'
#' @docType package
#' @name foo
NULL
#> NULL
文档化类
对于不同的对象系统的类,泛型函数和方法的document有差别
测试 tests/
自动化测试主要使用的包是testthat
初始设置使用usethis::use_testthat()
这个函数做了一下三件事:
- 创建
tests/testthat文件夹 - 将
testthat加到DESRIPTION里面的Suggests字段 - 创建
tests/testthat.R文件
基本流程是:
- 修改代码或者测试
- 使用
Ctrl/Cmd + Shift + T或者devtools::test()来测试包 - 重复直到通过测试
测试文件是在tests/testthat/里面,并且文件的名称要以test开头,下面是stringr包的一个test文件
context("String length")
library(stringr)

test_that("str_length is number of characters", {
  expect_equal(str_length("a"), 1)
  expect_equal(str_length("ab"), 2)
  expect_equal(str_length("abc"), 3)
})
#> Test passed 😀

test_that("str_length of factor is length of level", {
  expect_equal(str_length(factor("a")), 1)
  expect_equal(str_length(factor("ab")), 2)
  expect_equal(str_length(factor("abc")), 3)
})
#> Test passed 🌈

test_that("str_length of missing is missing", {
  expect_equal(str_length(NA), NA_integer_)
  expect_equal(str_length(c(NA, 1)), c(NA, 1))
  expect_equal(str_length("NA"), 2)
})
#> Test passed 😀
测试是分层的: expectations→tests→files
- expectation 以
expect_开头的函数 - test 是以单元组合起来的,一个test里面测试的是一个功能,以
test_that开头 - file 将多个相关的测试组合起来 以
context()开头
expectation
所有的expectation有相似的结构:
- 以
expect_开头 - 有两个参数,第一个是函数运行的结果,第二个是期望的结果
- 如果实际运行的结果和期望的不一样,就会报错
最重要的expectation函数有:
-
测试相等:
expect_equal()和expect_identical()expect_equal()是基于all.equal()的,而expect_identical()是基于identical,所以前者是估计的,后者是精确的:expect_equal(10, 10 + 1e-7) expect_identical(10, 10 + 1e-7) #错误: 10 not identical to 10 + 1e-07. #Objects equal but not identical -
expect_match是基于greplstring <- c("Testing is fun!","abc") # expect_match(string, "Testing") # 错误: `string` does not match "Testing". # Actual values: # * Testing is fun! # * abc expect_match(string, "Testing",all = FALSE) # Fails, match is case-sensitive expect_match(string, "testing") # Additional arguments are passed to grepl: expect_match(string, "testing", ignore.case = TRUE,all = FALSE) -
还有几个
expect_match()的变体:expect_output()匹配输出;expect_message()检查信息;expect_warning()检查warning;expect_error()检查错误a <- list(1:10, letters) str(a) # List of 2 # $ : int [1:10] 1 2 3 4 5 6 7 8 9 10 # $ : chr [1:26] "a" "b" "c" "d" ... expect_output(str(a), "List of 2") expect_output(str(a), "int \\[1:10\\]") ## or expect_output(str(a), "int [1:10]",fixed=TRUE) expect_message(library(mgcv), "This is mgcv") -
expect_is()检查某个对象是不是继承自一个特定的类:model <- lm(mpg ~ wt, data = mtcars) class(model) #[1] "lm" expect_is(model, "lm") expect_is(model, "glm") #错误: `model` inherits from `lm` not `glm`. -
expect_true()andexpect_false()当没有其他的expectation可用时使用
tests
使用test_that来写测试,这个函数有两个参数:第一个是test的名称(一句话描述),第二个是测试代码块,以{}括起来,由多个expectations组成
file
使用context写一个简短的介绍文件中的测试内容
roxytest
roxytest以roxygen2注释的形式来写测试,可以自动生成tests/testthat/里的测试文件(.R)
需要首先在DESCRIPTION文件中加入以下的内容:
Roxygen: list(roclets = c("namespace", "rd",
                          "roxytest::testthat_roclet",
                          "roxytest::param_roclet",
                          "roxytest::return_roclet"))
#' bind two factors
#'
#'Create a new factor from two existing factors, where the new factor's levels
#'are the union of the levels of the input factors.
#'
#' @param a factor
#' @param b factor
#'
#' @return factor
#' @export
#'
#' @examples
#' fbind(iris$Species[c(1, 51, 101)], PlantGrowth$group[c(1, 11, 21)])
#'
#' @tests
#' x <- c("a", "b")
#' x_fact <- factor(x)
#' y <- c("c", "d")
#' z <- factor(c("a", "b", "c", "d"))
#' expect_identical(fbind(x, y), z)
#' expect_identical(fbind(x_fact, y), z)

fbind <- function(a, b) {
  factor(c(as.character(a), as.character(b)))
}
可以使用@tests和@testexamples tag来在注释中写测试代码
再运行roxygen2::roxygenise()就会在tests/testthat/下面生成一个test-roxytest-tests-fbind文件:
# Generated by roxytest: Do not edit by hand!

context("File R/fbind.R: @tests")

test_that("Function fbind() @ L27", {
  x <- c("a", "b")
  x_fact <- factor(x)
  y <- c("c", "d")
  z <- factor(c("a", "b", "c", "d"))
  expect_identical(fbind(x, y), z)
  expect_identical(fbind(x_fact, y), z)
})
Namespace
Namespace就是给名字提供一个空间,比如我们在使用::的时候:已知plyr和Hmisc包都含有summarize这个函数,如果我们先载入了plyr再载入了Hmisc那么在使用summarize的时候就会在Hmisc的namespace中寻找summarize;相反,如果先载入Hmisc,那么就会使用plyr中的summarize函数,所以为了避免混淆,我们需要使用::来指定搜索的namespace
在NAMESPACE文件中主要使用imports和exports
imports 将外部的(其他包中)的函数导入
exports 规定哪些函数在包外部可用
下面是testthat包的NAMESPACE的一个片段:
# Generated by roxygen2 (4.0.2): do not edit by hand
S3method(as.character,expectation)
S3method(compare,character)
export(auto_test)
export(auto_test_package)
export(colourise)
export(context)
exportClasses(ListReporter)
exportClasses(MinimalReporter)
importFrom(methods,setRefClass)
useDynLib(testthat,duplicate_)
useDynLib(testthat,reassign_function)
NAMESPACE里的每一行都是一个指令,描述了一个R对象,是从我们的包导出给外部使用,还是从其他的包导入供我们使用
一共有8个namesapce指令,4个表示exports,4个表示imports
4个exports为:
export(): 导出函数,包括S3 S4泛型函数.exportPattern(): 导出可以匹配模式的所有函数exportClasses(),exportMethods(): 导出所有S4类和方法S3method(): 导出S3方法
4个imports为:
import(): 导入一个包的所有函数importFrom(): 导入选择的函数(包括S4泛型函数)importClassesFrom(),importMethodsFrom(): 导入S4类和方法useDynLib(): 从C导入一个函数
这些都是不需要手动改的,可以使用roxygen2来生成
基本流程是:
生成namespace和生成函数的document是一样的,在R代码前面使用roxygen块(以#'开头)和tags(以@开头)
基本流程为:
- 在
.R文件前面加上roxygen注释 - 运行
devtools::document()或者使用快捷键Ctrl/Cmd + Shift + D将注释转化为.Rd文件 - 查看
NAMESPACE,运行test确保正确 - 重复直到测试通过
Exports
要export一个对象,需要在roxgen注释块里面加上@export标签,如:
#' @export
foo <- function(x, y, z) {
  ...
}
Imports
注意DESCIPRTION中的Imports字段和NAMESPACE中的import()命令的区别:
Imports字段只是确保当我们的包被安装的时候这些包也被安装了,并没有使函数可用,如果想要用这些函数就需要使用::或者import命令来导入函数,所以所有被NAMESPACE提到的包必须在DESCIPRTION的Imports或者Depends字段中
如果我们使用来自其他包的少量函数,建议是在DESCRIPYION文件的Imports字段中包含包的名称,再使用::来调用函数,而如果我们需要重复使用函数,这个时候使用::就不太方便,可以使用@importFrom pkg fun的形式来导入,另外这种方法也有性能上的一些优势:::会多用大概5微秒的时间;我们也可以使用类似的方法导入操作符如:@importFrom magrittr %>%(其实也是一种函数);如果我们需要使用另一个包的大量函数,可以使用@import package来导入另一个包的所有函数;另外要使得我们包中每个函数都可以使用外部包的函数,就需要对NULL加上注释:
#' @importFrom pkg fun
NULL
Others
- usethis::use_pipe 在R包中使用管道符
-
usethis::use_tidyeval 在R包中使用非标准计算
- pkgdown 为包创建网站
- rhub 对R包进行多平台的测试
在包中使用管道符%>% 可以使用usethis::use_pipe
> use_pipe(export = TRUE)
✓ Adding 'magrittr' to Imports field in DESCRIPTION
✓ Writing 'R/utils-pipe.R'
● Run `devtools::document()` to update 'NAMESPACE'
这个函数将magrittr包加到DESCRIPTION的Imports字段里面;生成R/utils-pipe.R文件;将管道符import,如果设置export=TRUE,可以使得管道符在外部可用(不需要用户再去导入magrittr包了)
#' Pipe operator
#'
#' See \code{magrittr::\link[magrittr:pipe]{\%>\%}} for details.
#'
#' @name %>%
#' @rdname pipe
#' @keywords internal
#' @export
#' @importFrom magrittr %>%
#' @usage lhs \%>\% rhs
NULL
参考: